
 |
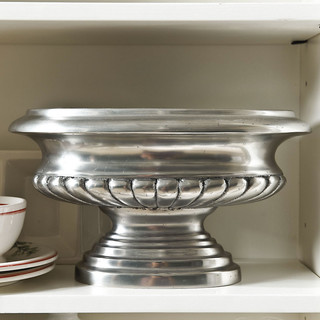
| Ballard Designs Vintage Silver Urn |


Materials:
Planter
Paint suited for your planter (Silver and Black) were my choices
Antique Medium (it's in the craft paint section)
Flowers/Filler/Foam
Sponges
Paper Plates
Paper Towels
Instructions:
- Paint 2 to 3 even coats of your base color on your planter. I didn't even bother with the inside, just up to the lip. I did 2 coats of silver because I still like the warm glow from the brass underneath... This is a solid coat, so some of your planter's details will be washed out with the solid color... Do not fear, the antiquing medium can be used to add dimension to your planter!
- Mix your antiquing medium and black together on your plate and highlight any features on your planter... I used a 50:50 ratio of my medium and black paint and dabbed the mixture all over. I did 2 layers of this process. First, I dabbed in circular motions onto the planter with the mixture and 'spot' dabbed with a crumpled paper towel removing the mixture until it looked right and then moved to the next side. Then, with the second layer I angled my sponge to highlight the curves in the planter and lightly dabbed with the paper towel until I got the look I wanted... This is going to be a process for you and when it looks right to you - STOP!
- Add floral foam and real/fake flowers as you wish!
- Step back, pat yourself on the back and admire proudly!!
I am so pleased with how my planter/urn turned out! I had all of the materials (from different projects), so this cost me nothing! But, if you had to go out and buy these things, you can always find very inexpensive planters at Goodwill/Thriftshop and use your paint and flower stash. I always buy my flowers on clearance at the end of the season, but if you don't, sometimes you can use a 40% off coupon or they may be half off randomly throughout the year... The antiquing medium can be bought with a 40% off coupon, too!
Hope this post inspires you to knock your own new favorite!
Take care!
Great DIY project! You nailed the look of the BD pot beautifully! :)
ReplyDeleteThank you, Nancy! I am really pleased with how it turned out and now it's getting so much use! I love it when that happens! Thank you for coming by!
Delete